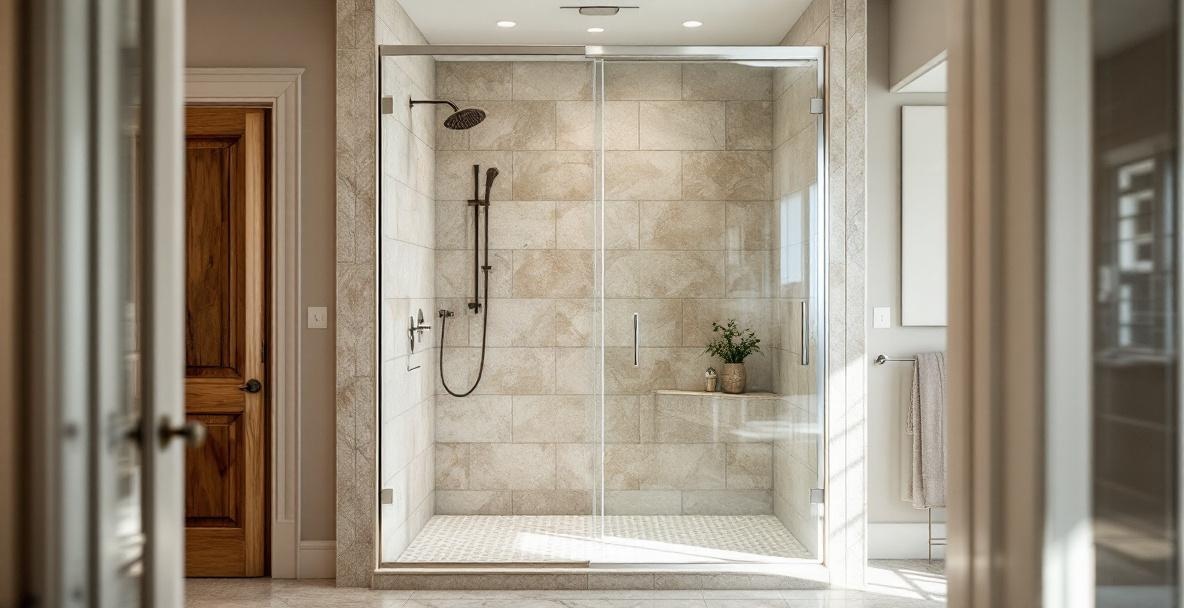
A professional shower door installation in DFW follows seven ordered steps: precise measuring of the opening, ordering custom glass and hardware, preparing the shower area, setting the bottom track or threshold, installing hinges on the glass, hanging and adjusting the door, and sealing with a final inspection. Most single-door installs take 2 to 4 hours on install day, but the full timeline from measurement to finished door typically runs 2 to 3 weeks because glass is fabricated to exact dimensions.
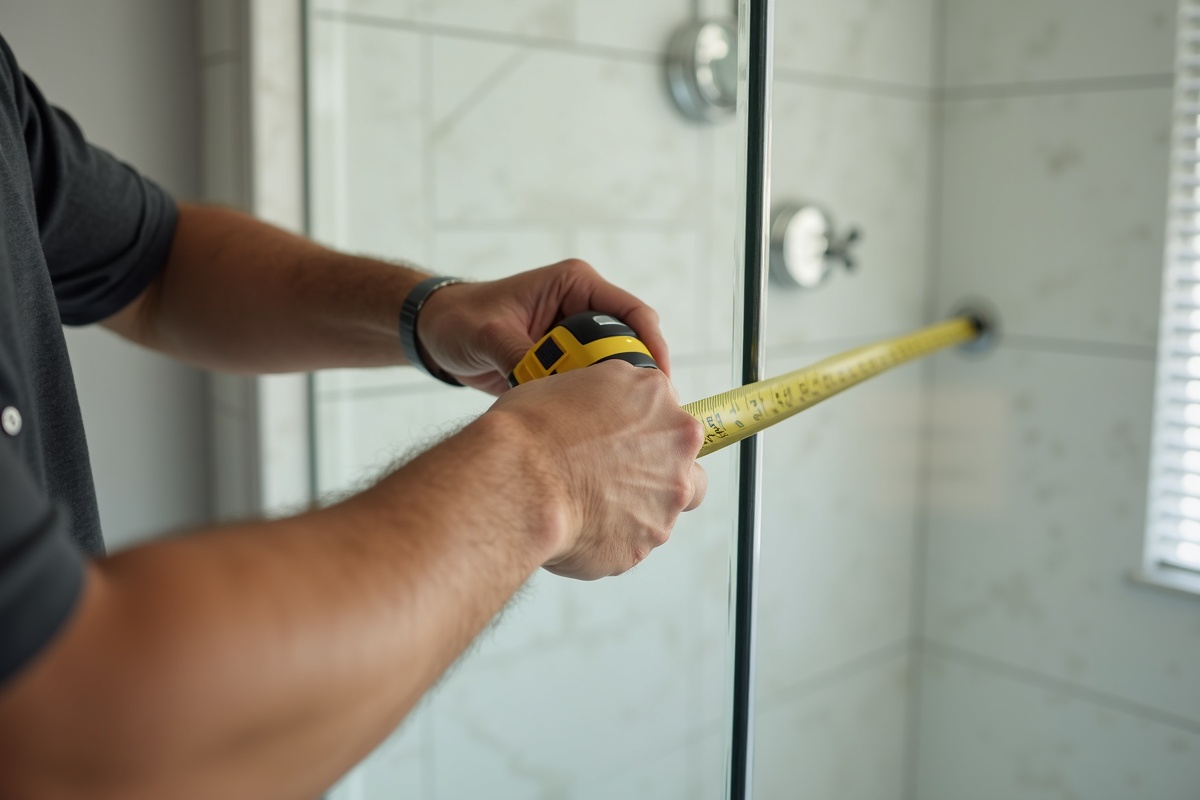
If you have never had a custom shower door installed, the process can feel opaque — the installer disappears into the bathroom and reappears hours later with a finished enclosure. This guide breaks down every step so you know exactly what is happening, how long each part takes, and what to verify before the installer leaves. Shower door installation is a precision job: a 1/8 in. error in measurement can ruin a $2,000 glass panel, so the process is built around measure twice, cut once.
Step 1: Measuring Your Shower Opening Precisely
Precision measurement is the single most important step in shower door installation. Errors of 1/8 in. or more cause 28% of all shower door rework (GlassBuild 2024). The installer measures the opening width at the top, middle, and bottom; measures plumb on both walls; and measures level on the curb. Walls are rarely perfectly plumb and curbs are rarely perfectly level — the glass must be fabricated to accommodate real-world variation.
The installer arrives with a digital level, plumb laser, and tape measure. They will measure:
- Opening width at the top, center, and bottom of the shower
- Height from curb to where the top of the glass will sit
- Plumb (vertical straightness) of each wall from floor to ceiling
- Level across the threshold or curb
- Tile thickness where glass clamps or hinges will anchor
These measurements get recorded to the nearest 1/16 in. and photographed. The installer notes any out-of-square conditions that will require custom fabrication — for example, a wall out of plumb by 1/4 in. over 72 in. means the glass edge will need a compensating angle.
28%
of all shower door rework is caused by precision measurement errors of 1/8 in. or more (GlassBuild 2024)
Step 2: Ordering Custom Glass and Hardware
After measuring, the installer submits specifications to the glass fabricator: exact dimensions, glass thickness (most frameless doors use 3/8 in. or 1/2 in. tempered), edge treatment (polished, beveled, or mitered), hardware type (hinge style, handle finish), and any notch cuts for plumbing or bench obstructions. Custom-fabricated tempered glass typically takes 7 to 14 business days from order to delivery in DFW.
The glass order includes every cut-out and hole location. Tempered glass cannot be drilled or cut after tempering — all holes, notches, and edges must be finished before the glass goes into the tempering oven. This is why the measuring step is so critical: a single mistake means re-ordering a $600 to $2,000 panel.
While you wait for fabrication, the installer orders hinges, handles, clips, channels, and seals. Most DFW showrooms carry common finishes (chrome, brushed nickel, matte black, brushed gold) in stock, but specialty finishes like brushed bronze or unlacquered brass can add 1 to 2 weeks.
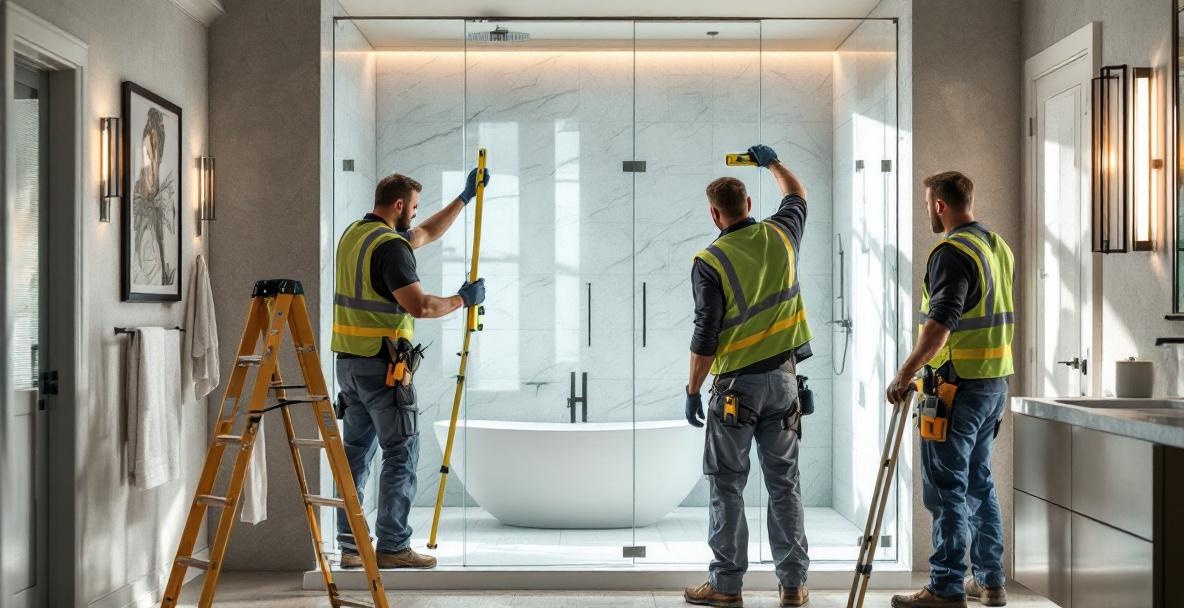
Step 3: Preparing the Shower Area for Installation
On installation day, the installer protects your bathroom (drop cloths, blue tape on fixtures), removes the old shower door if replacing one, and inspects the tile substrate. If any grout is missing or caulk is deteriorated along the shower curb, it must be repaired before the door goes in — glass hardware anchors into solid material only.
Preparation steps the installer performs before touching glass:
- Lay drop cloths over the floor and protect the vanity, toilet, and fixtures
- Remove the old shower door, tracks, and caulk (if replacing)
- Clean any residual silicone from tile surfaces with a razor blade
- Inspect tile for cracks, loose pieces, or soft spots behind the tile (tap test)
- Verify backing blocks or studs are present behind the tile where hinges will anchor
Hinges on a frameless glass shower door can weigh 80 to 120 lbs when loaded with glass. They require solid backing — either plywood behind the tile or hitting a stud. If the installer discovers drywall-only construction behind the hinge location, stop. Retrofitting a backer requires opening the wall from the other side, a job most glass installers will refer to a carpenter.
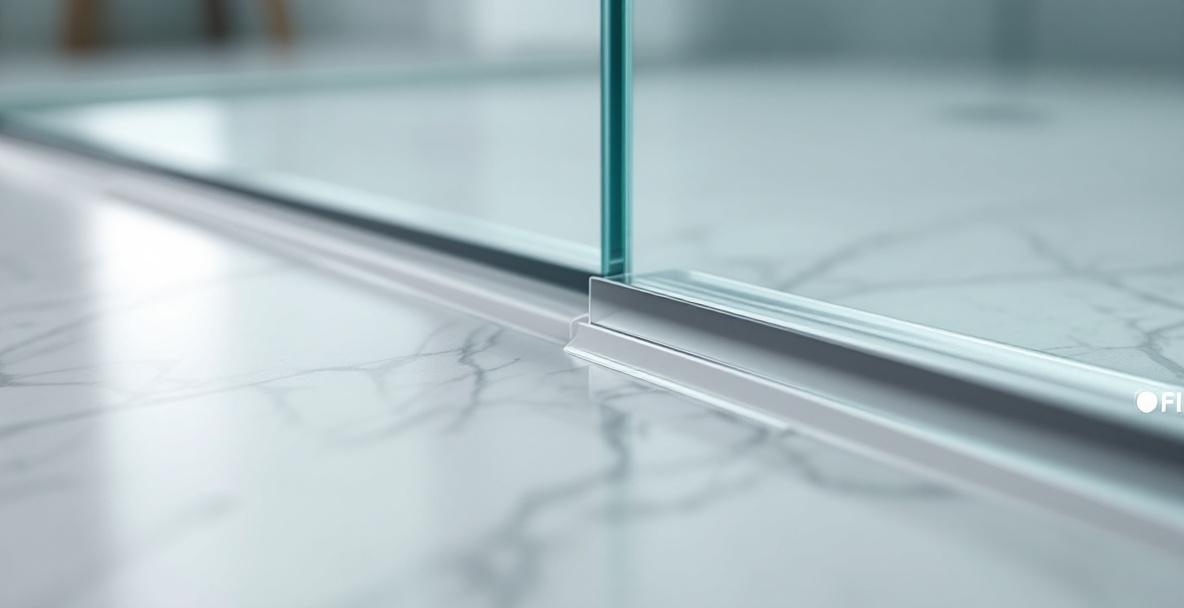
Step 4: Setting the Bottom Track or Threshold
For framed and semi-frameless doors, a metal bottom track or U-channel is installed first along the curb and walls. The track is leveled, dry-fit, then bedded in silicone and screwed or clipped into place. Frameless doors often skip the track entirely and use only a vinyl bottom sweep that clips onto the glass edge, preserving the minimalist look.
The bottom track installation sequence:
- 1
Dry-fit the track on the curb
The installer positions the track and checks that it sits level and follows the curb line evenly without rocking. - 2
Mark and pre-drill anchor holes
For tile installations, the installer uses a diamond-tip drill bit and water lubrication to prevent tile cracking. - 3
Bed the track in silicone
A bead of 100% silicone sealant is applied under the track to prevent water intrusion beneath it. - 4
Secure the track with anchors
Stainless steel anchors or manufacturer-supplied screws hold the track in place while the silicone cures. - 5
Wipe excess silicone cleanly
Excess sealant is removed immediately with isopropyl alcohol so cured residue does not remain on the tile.
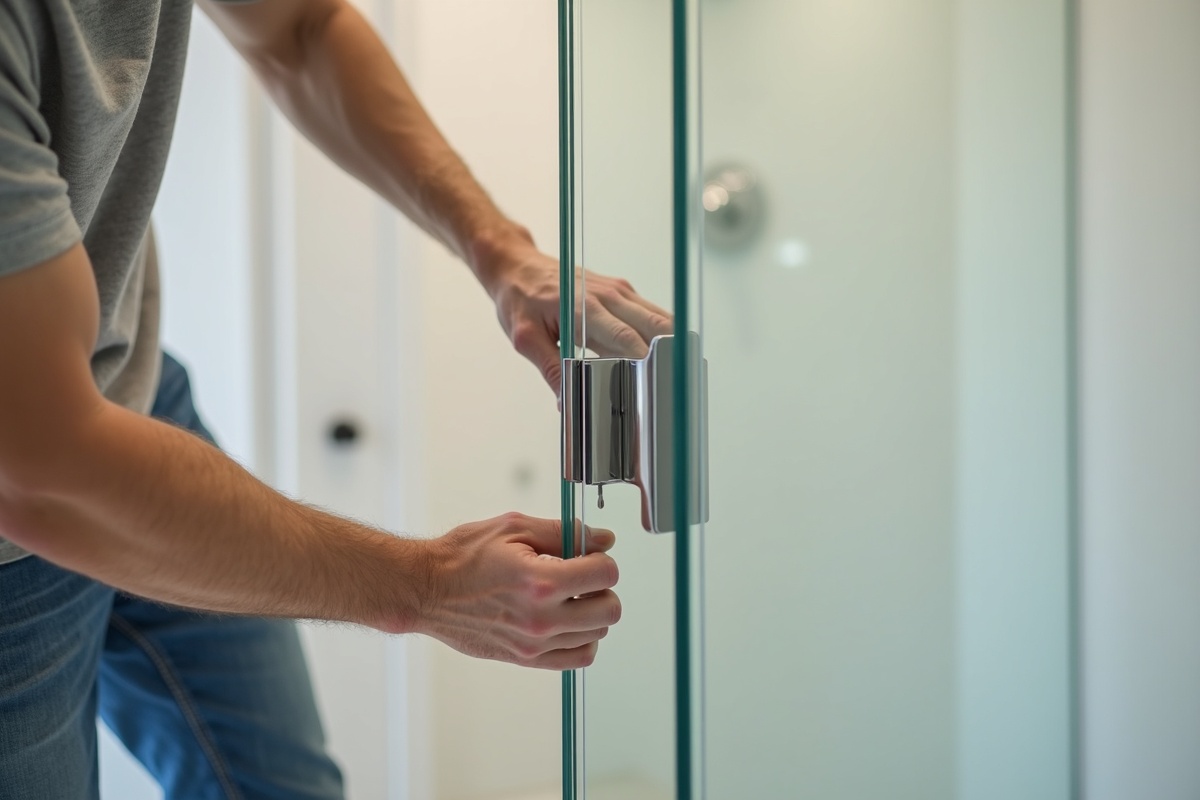
Step 5: Installing Hinges and Hardware on the Glass
Hinges, clips, and handles are attached to the glass before the glass is hung. Most frameless hinges are either wall-mount (anchored to the tile and wrapping the glass edge) or glass-to-glass (connecting a fixed panel to a swinging door). Each hinge attaches through pre-drilled holes in the tempered glass using rubber or nylon gaskets that prevent glass-to-metal contact.
The installer lays the glass panel flat (supported by padded sawhorses) to attach hardware without risking edge chips. Hinge gaskets must be centered and torqued to manufacturer spec — over-tightening can stress tempered glass to the breaking point, while under-tightening lets the door sag over time.
Step 6: Hanging and Adjusting the Door
With hardware attached, two installers lift the glass panel into position (doors weigh 60 to 120 lbs each). Wall-mount hinges are anchored into pre-drilled tile and backing, then the door is swung and checked for gaps, swing resistance, and self-closing action. Most hinges offer 1/8 in. of vertical and horizontal adjustment for final alignment.
Adjustment targets the installer verifies:
- Uniform gap (1/8 in. typical) along the side jamb from top to bottom
- No binding or dragging at any swing angle
- Door stays at 90 degrees when held open (or returns to closed if self-closing hinges are specified)
- Handle and latch align with strike plate on the opposite panel
- Magnetic seal strip makes full contact along door-to-door or door-to-wall closure (NKBA 2026)
| Gap too wide at top |
| Door drags on curb |
| Door swings open by itself |
| Handle does not align |
Step 7: Sealing and Final Inspection
The final step applies silicone sealant along the inside perimeter — where glass meets wall, curb, and any adjacent fixed panels. Silicone must be 100% neutral-cure mildew-resistant (never acetoxy on stone tile). The installer tools the bead smooth, removes excess with isopropyl alcohol, and instructs you not to use the shower for 24 to 48 hours while silicone fully cures (Dow Chemical 2024).
Before the installer leaves, they should walk you through:
- How to operate the door (hinge action, magnetic closure, handle feel)
- When you can first use the shower (typically 24 to 48 hours)
- Which cleaning products are safe (no ammonia on tempered glass, no vinegar on hardware finishes)
- Warranty paperwork for glass and hardware
- How to contact them if you notice a problem in the first 30 days
24 to 48 hrs
silicone sealant cure time before the shower can be used without compromising the waterproof seal (Dow Chemical 2024)
Do a "spray test" with the installer present: close the door, turn on the shower, and direct the showerhead at every seam and seal. Any drips you find in the first 60 seconds get fixed while the installer is still on-site. After they leave, you own any leak discovery.
Frequently Asked Questions
How long does the shower door installation process take from start to finish?
Installation day itself takes 2 to 4 hours for a single frameless door, 4 to 6 hours for a complex enclosure with multiple panels. The full timeline from first measurement to finished door typically runs 2 to 3 weeks in DFW because tempered glass is custom-fabricated to your exact dimensions. Rush fabrication is sometimes available at a premium but rarely shortens the timeline by more than a few days.
Do I need to be home during shower door installation?
You or another authorized adult should be home at the start and end of the installation. The start matters because the installer may discover a condition (hidden damage, wrong anchor substrate, a measurement question) that requires a decision. The end matters so you can perform the spray test, sign off, and get a walkthrough of the door operation and warranty.
What should I do to prepare my bathroom for shower door installation?
Clear the shower and surrounding area of toiletries, bath mats, and anything on the vanity or toilet. Make sure the installer has access to water (for diamond-tip drilling) and electricity (for power tools). If pets are in the home, confine them — installers carry tempered glass panels through hallways and a startled pet can cause a break.
How long after installation before I can use the shower?
Wait 24 to 48 hours before running water on the silicone seals. Cure time varies with temperature and humidity, but DFW bathrooms (climate-controlled, moderate humidity) typically reach full cure at the 24-hour mark. Using the shower before silicone cures breaks the waterproof seal and you will see leaks at the seams within the first week.
What should I do if I notice a problem after shower door installation?
Document it with photos and video, then contact the installer within 30 days. Most reputable DFW glass companies offer a 1-year installation warranty covering adjustment, leak repair, and any hardware that fails. Manufacturer warranties on the glass itself (typically tempered glass for life, hardware for 5 to 10 years) are separate and processed through the fabricator.
Also see our frameless shower doors Dallas TX guide and our shower enclosure design mistakes to avoid for what to get right before installation day.
Ready to schedule your DFW shower door installation? Contact Infinity Glass & Glazing for a free in-home measurement and quote. Our team handles every step from measurement through final inspection across Corinth, Denton, Frisco, Dallas, Fort Worth, and the surrounding DFW metro.
Related reading: